Ankle Taping Techniques
Video:
This video gives a great, quick run-through of pre-wrap, setting the foundations (Horseshoe’s & Stirrups), and heel locks. There are other methods to stabilize the ankle joint, such as Figure 6’s or 8’s. Please read the guides below and come to open labs !
PDF ANKLE TAPING GUIDE – By Marshfield Clinic
Brought to you by: www.physioadvisor.com
The following taping techniques may be used to provide support for the ankle and are particularly beneficial following a lateral ligament sprain of the ankle, or, to prevent an ankle sprain. Generally it is recommended that the ankle is shaved 12 hours prior to taping (to prevent painful removal of hairs and skin irritation). The skin should be cleaned, removing any grease or sweat, and should be dry. Low irritant Fixomull tape should be applied as an under-wrap to reduce the likelihood of skin irritation with rigid sports tape over the top of this. Some, or all, of these ankle taping techniques may be applied to tape the ankle and provide the support required for the individual.
Anchor
Place a strip of tape around the lower 1/3 of the shin (figure 1). This should be applied gently to prevent circulatory problems and is used as a fixation point for the other ankle taping techniques.
Figure 1 – Anchor
Stirrups
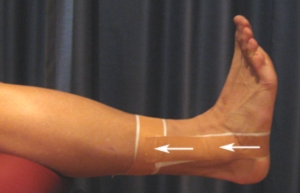
Keeping the foot and ankle in a neutral position (foot and toes pointing vertically upwards), start the tape at the level of the anchor on the inner aspect of the ankle and lower leg. Begin this ankle taping technique by following the black arrows (figure 2) and conclude this taping technique at the level of the anchor at the outer aspect of the ankle and lower leg by firmly following the white arrows (figure 3). Do 2-3 stirrups just slightly forwards and backwards of each other depending on the amount of support required.
Figure 2 – Beginning of Stirrup (Inner Ankle)
Figure 3 – End of Stirrup (Outer Ankle)
Figure-of-6’s
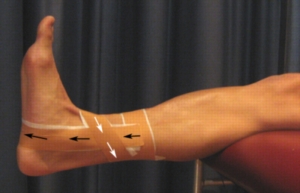
Keeping the foot and ankle in a neutral position, start the tape at the level of the anchor on the inner aspect of the ankle and lower leg. Begin this ankle taping technique by following the black arrows (figure 4) and conclude this taping technique by firmly following the white arrows to the inner aspect of the ankle (figures 4 & 5). Do 1-3 Figure-of-6’s slightly forwards and backwards of each other depending on the amount of support required.
Figure 4 – Figure-of-6 (Inner Ankle View)
Figure 5 – Figure-of-6 (Outer Ankle View)
Basic Ankle Taping Recipe
The following is a basic recipe that is commonly used by physiotherapists to support or prevent a lateral ligament sprain of the ankle:
1. Anchor x 1
2. Stirrups x 2 – 3
3. Figure-of-6’s x 2 – 3
Repeat Anchor x 1
Wrist Taping Techniques
The following wrist taping techniques may be used to provide support for the wrist and are particularly beneficial following a sprained wrist, or, to prevent a sprained wrist. Generally it is recommended that the wrist is shaved 12 hours prior to taping (to prevent painful removal of hairs and skin irritation). The skin should be cleaned and dried, removing any grease or sweat. Low irritant Fixomull tape should be applied as an under-wrap to reduce the likelihood of skin irritation with rigid sports tape over the top of this.Some or all of these taping techniques may be applied to tape the wrist and provide the support required for the individual.
Anchors
Place a strip of tape around the palm of the hand just below the four fingers and a strip of tape around the forearm, just before the wrist (figure 1). This should be applied gently to prevent circulatory problems and is used as a fixation point for the other wrist taping techniques.
Figure 1 – Anchors
Dorsal Crosses
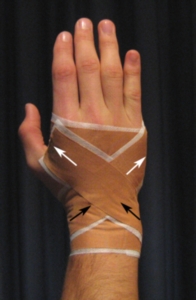
Keeping the wrist in a neutral position (wrist should be bent backwards slightly – about 30 degrees), start the tape at the level of the forearm anchor on the back of the wrist by following the black arrows (figure 2). Conclude this wrist taping technique at the level of the palm anchor by firmly following the white arrows (figure 2). 2 pieces of tape should be used forming a cross – one beginning from the inner wrist and travelling to the outer hand, the other beginning from the outer wrist, travelling to the inner hand (figure 2). Do 1-2 dorsal crosses depending on the amount of support required.
Figure 2 – Dorsal Crosses
Palmer Crosses
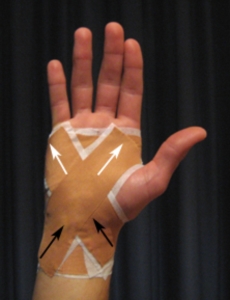
Keeping the wrist in a neutral position (wrist should be bent backwards slightly – about 30 degrees), start the tape at the level of the forearm anchor on the palm side of the wrist by following the black arrows (figure 3). Conclude this wrist taping technique at the level of the palm anchor by firmly following the white arrows (figure 3). 2 pieces of tape should be used forming a cross – one beginning from the inner wrist and travelling to the outer palm, the other beginning from the outer wrist, travelling to the inner palm (figure 3). Do 1-2 palmer crosses depending on the amount of support required.
Figure 3 – Palmer Crosses
Video:
Thumb Taping Techniques
The following thumb taping techniques may be used to provide support for the thumb and are particularly beneficial following a sprained thumb, or, to prevent a sprained thumb. Generally it is recommended that the area is shaved 12 hours prior to taping (to prevent painful removal of hairs and skin irritation). The skin should be cleaned and dried, removing any grease or sweat. Low irritant Fixomull tape should be applied as an under-wrap to reduce the likelihood of skin irritation with rigid sports tape over the top of this.Some or all of these taping techniques may be applied to tape the thumb and provide the support required for the individual.
Anchor
Place a strip of tape around the forearm, just below the wrist (figure 1). This should be applied gently to prevent circulatory problems and is used as a fixation point for the other taping techniques.
Figure 1 – Anchor
Side Loop
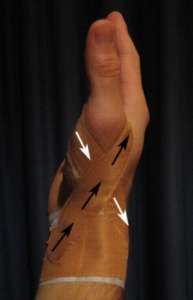
Keeping the wrist and thumb in a neutral position (wrist should be bent backwards slightly – about 30 degrees), start the tape at the level of the anchor on the front of the wrist by following the black arrows (figure 2). Conclude this thumb taping technique at the level of the anchor by firmly following the white arrows (figure 2). Do 1 – 3 side loops slightly forward or backward of each other depending on the amount of support required.
Figure 2 – Side Loop
Front Loop
Keeping the wrist and thumb in a neutral position (wrist should be bent backwards slightly – about 30 degrees), start the tape at the level of the anchor on the front of the wrist by following the black arrows (figure 3). Conclude this thumb taping technique at the level of the anchor by firmly following the white arrows (figure 3). Do 1 – 3 front loops slightly forward or backward of each other depending on the amount of support required.
Figure 3 – Front Loop
Back Loop
Keeping the wrist and thumb in a neutral position (wrist should be bent backwards slightly – about 30 degrees), start the tape at the level of the anchor on the back of the wrist by following the black arrows (figure 4). Conclude this thumb taping technique at the level of the anchor by firmly following the white arrows (figure 4). Do 1 – 3 back loops slightly forward or backward of each other depending on the amount of support required.
Figure 4 – Back Loop
Removing the tape
Care should be taken when removing the tape to avoid injury aggravation or skin damage. Blunt Nosed Tape Scissors should be used. The tape should be removed slowly, pulling the tape back on itself with pressure placed on the skin as close as possible to the line of attachment of the tape.
Generally tape should be removed with 48 hours of application or sooner if there is any increase in pain or symptoms (including skin irritation or itchiness).
Preventative Taping For The Thumb
This taping is to support the proximal metacarpophalangeal joint of the thumb. Support is required following a thumb (abduction) sprain or to help stop reinjury of a weakened joint.
 |
Apply anchor: (Green Tape) with 3.8cm rigid Leuko Sportape gently around the wrist.Red Triangle : CMC = Carpo-metacarpal joint Blue Square : MCP = Metacarpo-phalangeal jointCaution: Avoid applying too tightly as this may compromise circulation. |
 |
Apply a spica (Figure 8): (Blue Tape) using either 1.25cm or 2.5cm rigid from the anchor on the back of the wrist around the base of thumb and back to the anchor on the palm side of the wrist. |
 |
Apply 2 to 4 other spica strips: (Red and Blue Tapes) to further support the CMC and MCP joints of the thumb. |
 |
Overwrap: (Brown Tape) with either 2.5cm or 5cm Leukolastic or Leukoband Lite elastic adhesive bandages for compression and protection. Repeat 3 or 4 times: (not shown) to fully support the area below thumb.Caution: Pinch thumb pad to check circulation is OK. |
Finger Taping Techniques
Preventative Taping For The Finger
This taping method is to support a sprained finger joint. Tape is applied above and below the joint.
 |
Use next finger as a splint: and position a strip of Leukofoam� Orthopaedic Support Foam to prevent rubbing between the fingers. |
 |
Apply 2 simple spirals: (Blue Tape) of Leuko Sportstape 1.25cm around the fingers. Leave the joint area exposed: to allow some movement. Always finish off on top to prevent tape rolling in contact sports. |


